Lengths of Objects
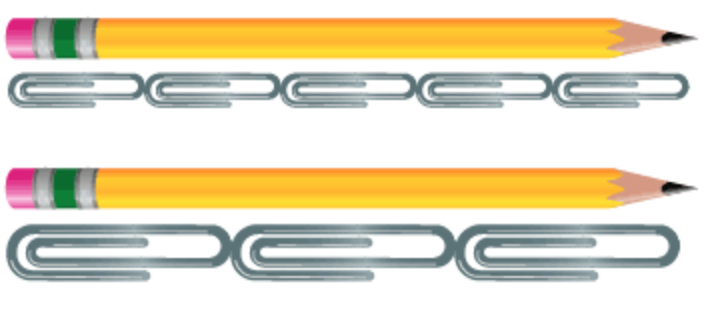
The students will show the lengths of objects as the number of same-size units of length with no gaps or overlaps. They will use small and large paperclips as the units of measurement.
Essential Question
What are the important rules of measurement? Why is it important to use the same size units of length when measuring?
Grade(s):
- 1
Subject(s):
Recommended Technology:
-Computer
-Smart Board
-Document Camera
Other Instructional Materials or Notes:
- Two Crayons
- Chart Paper
- Markers
- Small and Large Paper Clips
- Worksheet
- Bag of Materials for Worksheet for each table.
Lesson Progression
- Have students begin the lesson on the carpet. Start by reviewing with students what they have learned so far about measurement.
- Create an anchor chart with students on the rules of measurement. (line up endpoints, no gaps or overlaps, etc.)
- Have 2 different colored crayons with large and small paper clips. Choose one of the crayons and measure it using a combination of paper clips (ex. 1 big paper clip and 1 small paper clip). Do it again with the other crayon, except this time, show it using three small paper clips.
- Hold the two crayons up showing the endpoints, and discuss with students how they look to be the same length, but one is showing its 2 paperclips long, and the other is 3 paperclips long. Have students talk with each other about why this may be. (During this time the teacher should be listening in on the students’ conversations.)
- The teacher will bring students back together as a whole, and discuss what some students discussed. The teacher will explain to students how another rule for measuring is to make sure that all units of measurement used are the same length. (add this to the anchor chart that was done previously)
- Demonstrate measuring the crayons again, except this time choosing to use only the big paperclips or small paperclips.
- The teacher will then give students a worksheet. They will have 25 minutes to complete it.
- Once the time is up, the students will return to the carpet and review their answers. The teacher should ask students if they have any questions about the worksheet. After reviewing the worksheet, the teacher will give students a small assessment to complete in 10-12 minutes on their own to see what they learned from the lesson.
Teacher Notes
Differentiation: Print out objects on a 2D paper with guidelines (to hold the target "object" in place. Use the straight guiding line to assist with measurement. Introduce the strategy of having students make tick marks after each measure.
Extension: Give students objects other than paper clips to measure objects. Give students items to measure that may not have lengths equal to whole numbers (ex. instead of 3 paperclips, 2 1/2 paperclips). Give students only one item to measure instead of multiples (ex 1 paper clip instead of 3). Have students come up with word problems/scenarios to accompany measurement.
Worksheet
View ResourceLesson Assessment
View ResourceRug Time: Measurement | Sid the Science Kid
View ResourceMeasuring with Paper Clips
View ResourceMeasuring with a Paper Clip Ruler
View ResourceAssessments
Students will be assessed through the questioning that takes place during the lesson. They will also be assessed through the work they do on the worksheet, and the assessment given at the end of the lesson.