Pine Needle Basket Workshop

basket

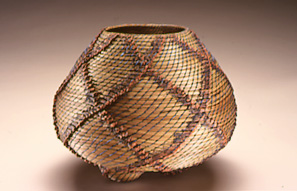
Clay Burnette created this pine needle basket which he calls "Tribal". You can make a pine needle basket, too. See what supplies you will need to make a simple basket of your own below and then use the navigation at the top to follow the steps.

  • A large bunch of pine needles, with the needles measuring at least 5 to 6 inches in length
  • 1 pint of boiling water
  • 1 large pan in which to soak the pine needles
  • 1 large tapestry needle (purchased at craft store)
  • 1 hank of raffia
  • Scissors
  • 1-inch length of soda straw

Pouring Hot Water Over Pine Needles

Getting Started

Gather your pine needles and place them in a large pan. With an adult to help you, pour about a pint of boiling water over the needles. Let them sit in the water for 10 minutes to soften, then using tongs, place the needles on paper towels to let them drain and dry.

Person Grasping Pine Needles. Ready to Remove Caps.

Remove Caps.

The fascicles or heads of the pine needles can be removed for looks. These heads are also sometimes referred to as "caps" or "sheaths". If you choose to remove these caps, slide your thumbnail against the side of the pine needle cluster and pull the caps off. Do this to several dozen pine needles so you will have enough pine straw to complete your project.

Winding Raffia Around Pine Needle Bundle

Winding Raffia Around Pine Needle Bundle

First start with the foundation, the bottom, most center-piece of your basket. Trim about 10 lengths of raffia from the hank. Trim any thin, trailing sections from the raffia. Using a blunt 1-inch tapestry needle thread the thickest end of the raffia through the eye of the needle. Hold the clusters of pine needles together, wrapping the ends of them with raffia.

Coiling Wrapped Pine Needles

Coiling Wrapped Pine Needles

Shape the covered needles into a small circle by first curling the cap or sheath end. Keep in mind that the caps or sheaths themselves may have been removed, but in these instances you can still usually tell.

Stitching Pine Needle Coils Together

Stitching Pine Needle Coils Together

Push the threaded needle through the circle of dampened pine straw, drawing thread through from back to front. Go around the circle, stitching each new row onto the previous coil.

Growing the Coil

Growing the Coil

As the circle increases in size, you will need to add more dry pine straw and will need to add new lengths of raffia to sew the basket. 

Inserting Clusters of Needles.

Inserting Clusters of Needles.

Insert about seven new clusters of needles into the center of the bundle of straws that you are holding. Push the new needles into the ones coming out of the coil. You will secure the new needles by binding the raffia around the portion where the new and old bundles overlap. 

Placing the Soda Straw Over Pine Needles For Use As A Gauge

Placing the Soda Straw Over Pine Needles For Use As A Gauge

When inserting new needles to extend the length of your coil, consider placing a 1 inch section of soda straw over the needles to be a gauge. A gauge will help you keep an even amount of straw being fed and sewn to the basket. 

Adding a New Piece of Raffia.

Adding a New Piece of Raffia

When you have to add a new piece of raffia, thread the needle with the new piece of raffia, and knot the end of the old section with the longer new piece of raffia. Continue to work around the coil, blending the knot and any excess material from the old raffia into the coiling and stitching.

Stitch Spacing Is Important.

Stitch Spacing Is Important

Keep coiling and sewing stitches to hold the coils of rows together. Try to keep the circle of pine needles flat by bending it a bit. The spacing of the stitches will widen as the circle grows. Again, keep adding pine needles as needed to maintain the thickness of your coiled row. 

Keep Stitch Spacing As Even As Possible

Keep Stitch Spacing As Even As Possible

Add additional stitches to the growing coil. Take one or more stitches in the space between the wraps as you go. Try to keep the spacing as even as possible.

Getting Ready To Build Sides of Basket

Getting Ready To Build Sides of Basket

After you have about 8 rows of pine straw sewn together, build the sides of the basket. To start the sides of your basket, place the next row of pine needles on top and at the edge of your coil of pine needles. From this point, continue to add pine needles and raffia as needed, stitching each row down on top of the last row. 

Starting To Thin Pine Needles

Starting To Thin Pine Needles

When you have added three or four rows of pine straw to make the sides of the basket, start to reduce the amount of pine straw that you add as you approach the top of the basket, until the basket is flattened across the top. 

As Sides Grow, Needles Thin, Tapering Down To Almost Nothing

As Sides Grow, Needles Thin, Tapering Down To Almost Nothing

The amount of pine straw that you use should be slowing thinning as you reach completion. 

image

Stitching at the Top

Stitch over the last stitch twice, and then push the needle down through the wall of the basket to the inside. With your scissors, snip off the last of the raffia where it cannot be seen. You have just made your first pine needle basket! 

image

Stitching at the Top

Stitch over the last stitch twice, and then push the needle down through the wall of the basket to the inside. With your scissors, snip off the last of the raffia where it cannot be seen. You have just made your first pine needle basket! 


Finished Basket Showing the Use of Other Types of Threading Materials.

Finished Basket Showing the Use of Other Types of Threading Materials.

For fun, try making coiled baskets out of other materials, such as sweet grass or kudzu. Or try using waxed linen or wire to stitch your basket together.  


Pine Needles in Bread Bag

Pine Needles in Bread Bag.

Store any extra cleaned and softened pine needles in a plastic bread bag up to two weeks so that they will be ready for your next project. You should not store pine needles in a completely airtight container.